Tuesday, May 24, 2016

Gauge panels, one step forward and 2 steps back

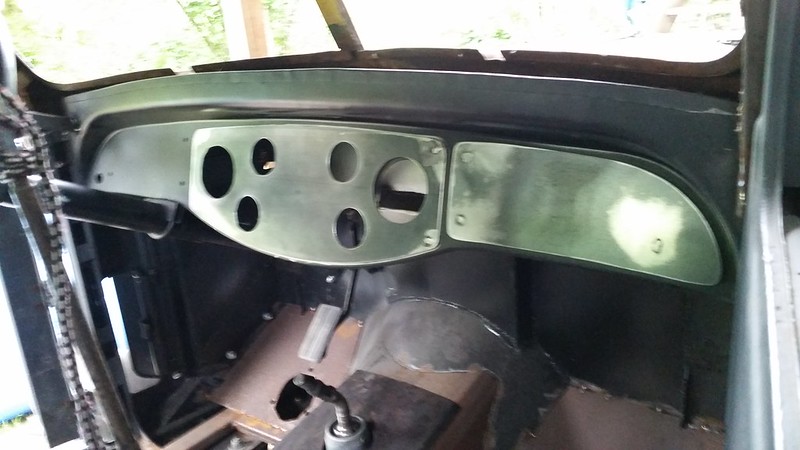
Well, I thought we had settled on doing a tiger maple veneer on the gauge panels, but it just hasn't worked right.  We decided on a gray stain/dye to tie in with the gray leather seat we are using.

So, we prepped the steel panels with epoxy primer and some gray primer over that (the epoxy primer is black and we didn't want it showing through on the edges).


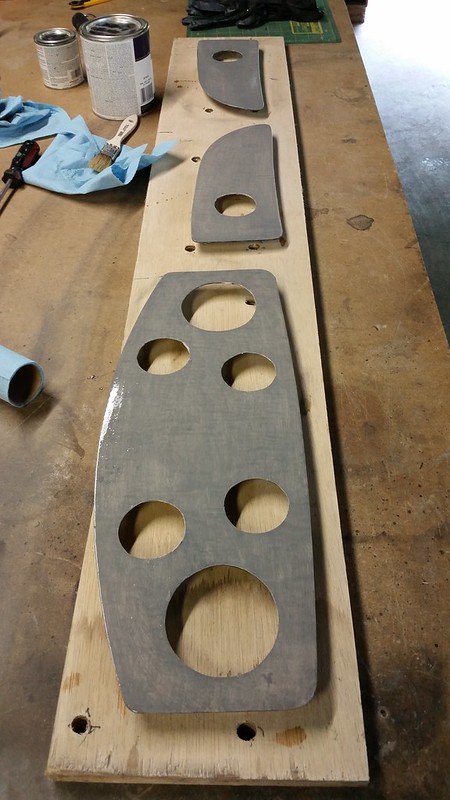
Then, we used spray contact cement to adhere the veneer and trimmed around the edges and sanded smooth:

We stained them with a Varathane 'weathered gray' stain.  HO-HUM.  The test piece turned out SO much better.

This was our tester, but we tested it on unsanded veneer (our first mistake):

The stain was too opaque to show much the figure of the maple in the sanded veneer :(
Major disappointment.
We chose an ivory paint for the background on the dash and I really like the color of the gray against it, but I was hoping for the figure of the tiger maple to show and it just didn't.  Not to mention, the next day it started lifting around the gauge holes and that was NOT acceptable.  So, off the veneer came and we are back to square one.  Deciding how to finish the panels has been the hardest of our decisions on this project for some reason!  I really want them to be special.....
Anybody have any good suggestions?  And, no, vinyl is NOT an option :P  Maybe gray leather, but that is near the bottom of my list.


Thursday, May 19, 2016

Gauge panels, part deaux

I did some researching about drilling good holes for the gauge panels before we dove in - and we decided to use a hole saw slightly smaller than the hole size necessary and then fine tune them.  We also decided to predrill the 1/4'' center hole and replace the center drill bit in the hole saw with a 1/4'' rod so the hole saw didn't ''walk'' away from it's intended position.  This worked very well!


We got all 3 panels prepped for the gauges with room left for other dash necessities to be added later.
(forgot to take a pic with the 3rd one over the steering column, oops!)


We ended up drilling a smaller hole for the dual air gauge centered over the steering column - and then on the opposite panel, the hole for the clock in the same (mirrored) location.

The decision has not been made yet on how to finish these panels......  leather is at the top of our list.  Personally, I would like to use a gray leather to match the seat - but Brian wants to use buckskin if possible.  We have several buckskins I inherited from my grandpa, but they might be a little thick to wrap around the tight radius' - so we plan to do a test piece and see if it works.  I would like to do the door panels and the visor in the same buckskin if we go that route, to tie it all together.  I think the backing of the dash will be a cream color - similar to original.


Monday, May 2, 2016

custom gauge panels

So, the Diamond T was out of the patio for a couple weeks while we did a spring cleaning for a family get-together, but now she is back inside.  We had planned to work on the roof section, but we didn't have enough steel for bracing to do what we needed to do.  So, we decided to work on the dash.  We are going to use aftermarket gauges, so new dash panels needed to be made since the new gauges are smaller than originals.  Brian drew around the original deluxe gauge panel onto the dash - the outside of that we dedided to replicate the same size/shape.


He got to use his new plasma cutter that he got for Christmas to cut out the panel:

while I created a template for a new larger gauge panel side section:


Brian finished the shaping of the gauge panel and added studs in the original location.  Now, we will just need to cut the holes to the right size for the gauges and finish the panel.  We are unsure how we will finish it.  Chrome?  Powdercoating?  Wrapped in Grandpa's deer leather?  Totally undecided at this point.

We got both of the larger side sections cut out (forgot to take a pic) - but we will need to finish shaping them and add studs to them next weekend.  The larger side section will cover the hole by the steering wheel that was originally for the ignition switch I think. An ignition switch might still go in that spot, but we have more options where exactly to put it with it covered up.  Then, after we get our gauges, I will be able to sell the original stainless set (and original gauges) for someone who wants to go back to original on their project.